I laid out my plan to go through my books and online resources for some simple lace patterns, and then make a swatch. I did do the first part of that, but as I got (over)thinking about the actual shawl itself and the fact that it is knit on the bias, with increases on every row and decreases on every second row, I thought maybe I would just give myself a little break and just knit the first one to get a little experience on the mechanics of knitting the shawl first before I got too fancy.
And since I was pretty sure of what tension I'd be using (8), I then decided to dispense with doing the swatch completely and just dive right in.
I used the "Community Coral" colourway, and wound it up for my machine. Here is what it looks like ready to knit:

The general pattern I used was as follows: when the carriage is on the left, decrease on the left by moving the two edge stitches one stitch to the right, and increase on the right by moving the two edge stitches one stitch to the right, and leave the empty needle in working position to create an eyelet. When the carriage is on the right, just do the increase. This effectively means that you are increasing one stitch every other row, and creating the biased shape on the alternate rows. This also creates a shawl with a asymmetrical point.
Here is my shawl early along in the process:

Once you get into a rhythm, and without any interruptions, it goes along fairly quickly at first. You can certainly see the effect of the biased fabric as the point curls around itself. But then just as you are getting into a pretty good rhythm, you end up over on the right side of the bed with no more needles available on which to increase, so it's time to move the work all the way over to the left.

So to do that I did a few rows of waste yarn (blue, in case that's not obvious), and rehung the stitches starting at the far left. Altogether I had to do this about four times, and with each consecutive time there were, of course, more and more stitches to rehang, and fewer and fewer rows between each move as the shawl took up more of the bed, so progress slowed down considerably. It occurred to me fairly quickly that I was probably going to run out of needles before I ran out of yarn (150 needles on a standard bed as compared with 200 I think on a standard?), and I was indeed correct.


While this was at first quite annoying (what am I going to do with 20% +/- of a ball?), I decided that the best solution for not wasting it would be to at least partially fringe the shawl. So that is what I will do.
Here is a picture of the shawl off the machine, ready to finish, fringe and block, and the yarn I had left over.
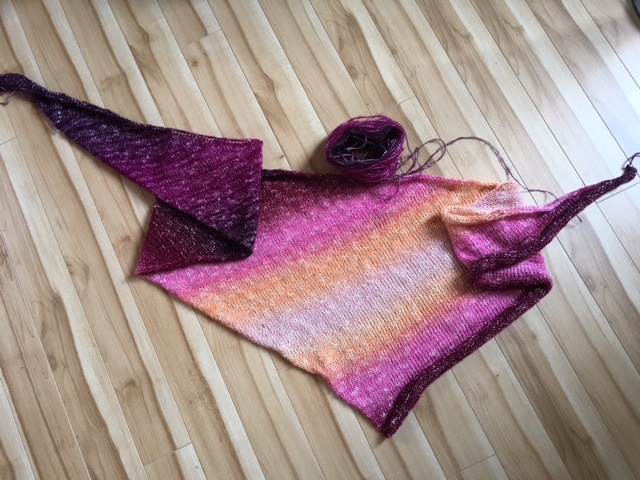
The longest edge (top edge in the photo) I estimate to be about 7 feet from point to point (unblocked). I think I will put the fringe on the shortest edge (the diagonal edge on the right in this photo). Total knitting time (including scrapping and rehanging) I estimate to be about 4 - 5 hours (I didn't keep a stopwatch, and I worked on it over a couple of days as time permitted). When I get the finishing done I will be sure to post a photo!
And what about the lace, you ask? Well, I have two more balls left, so I think that on at least one of those I will do a very simple eyelet lace, and I will do it when I see the colour start to change, and stop at the next colour change, and so on. That's the plan right now anyway, always subject to change!
If anyone else is working on this project, I'd love to hear about your experiences/ideas in the comments below!
Nancy
Just thought I'd let everyone know that I have decided to try the Shawl in a Ball on my Brother bulky machine. I tried it on Tension 5 (Nancy used Tension 8 on her mid-gauge) but it was much too loose. Next I tried Tension 3 and I think that's going to work. However, I don't have a bulky garter bar (I do have two standard garter bars and would love to trade one for a bulky if anyone is interested) so I will be using waste yarn to transfer the shawl as it grows. The other thing I realised is that I will be working with 110 needles rather than 150 so the cast off edge of my shawl will be narrower than Nancy's.
ReplyDeleteAnyone else tried a different machine?
I am still working on my shawl and thought I'd add a couple of comments for those of you planning to try your own shawl at the workshop on Saturday.
ReplyDelete1. Be prepared to take breaks every so many rows. Because you are sitting still and hand manipulating on every row I found it took a toll on my back and frequent breaks helped.
2. As I widen the shawl I added claw weights. Now that I am up to 50+ stitches on the machine I am using four weights. The shawl is knit at a loose tension so the stitches are inclined to jump off the needles if you don't have enough weight. So bring extra claw weights in your tool box.
For those of you who don't feel ready to tackle the shawl yet, come along anyway, bring your machine. see how to manipulate the stitches, and join us for a day of machine knitting. If you feel you just need a bit of help then bring a ball of yarn and Nancy and I will be there to assist you with this very simple project.
Happy knitting!