Tuesday, January 24, 2017

Sponge Bar Replacement Workshop

We have confirmed the Musquodoboit Harbour Public Library for Saturday, February 11, from 10 AM to 2 PM for our next get together to work on replacing the sponges in our tired and worn out sponge bars.

If you're interested, please let Lynne or myself know as soon as possible (we do have a few confirmed so far) either via email or in the comments below.


You will need to bring:
  • a sponge bar in need of some loving
  • flat tipped screwdriver
  • marking pen (a fine-tipped Sharpie if you have one is good)
  • ruler or tape measure
  • sharp scissors that you don't mine using on foam
  • brown bag lunch or lunch money - there is a coffee shop and pizza/deli shop very close to the library.
I will provide:
  • non-latex (neoprene or similar) disposable gloves (please let me know if anyone has allergies)
  • Goof Off (for cleaning out old stuck on foam)
  • Q tips/tooth picks
  • paper towel
  • White glue
  • fabric backed foam (I will attach the fabric to the foam in advance of the workshop as this has to be done in a well ventilated area)
  • old plastic tablecloths to protect the tables at the library
If anyone has a good sharp rotary cutter, long ruler suitable for use with the rotary cutter, and a self healing cutting mat that they would be willing to bring for us that day that would be most appreciated.

The cost for the supplies will depend on the number of people participating, but it will not be more than $10 per person, and more than likely less than that.

Other random bits of info:

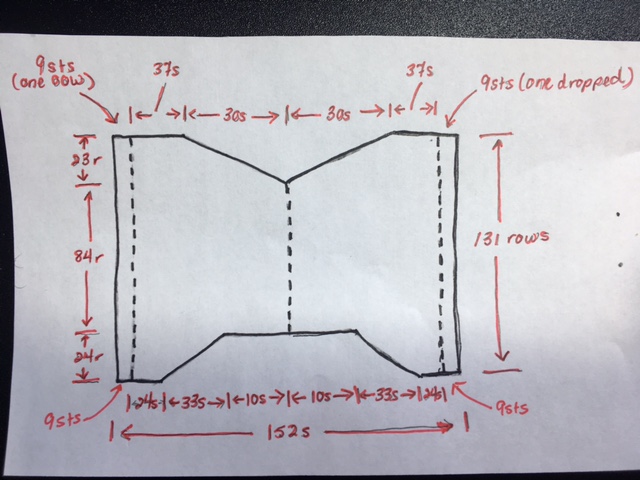
If you haven't started your hoodie yet, Valerie mentioned an important thing that I hadn't considered before.  If you have a machine with a knit leader (or knit radar?), which I don't and why I didn't think of it, then once you have the measurements of all the pieces to knit (and your tension swatch, which I know you all have by now!), you are good to go.  I have the extra step of converting all the measurements to stitches and rows, which I've now calculated for all of the pieces.  So watch for a post soon on finally getting this project to the machine.   I laugh a little to myself when I think that we started this project (the second time), back in November, and we probably could have whipped off 40 of these hoodies in the intervening 2+ months were it not for conversion calculations, holidays, work and general life interruptions.  Happily, however, it's not a race, and we keep this fun and informative.  At least that's my goal!

Let us know how you're getting along, and if you can come out for the sponge bar workshop on February 11.

Nancy

Sunday, January 15, 2017

Squeaky Clean

Well, perhaps not "squeaky" when it comes to our machines!  But certainly shiny and clean.

Let me just say what fun we had yesterday, and thank you to everyone who came out, and those in the library that poked their heads in to see what we were up to.  It was a very productive day, and great to see familiar faces and meet new ones.  Lynne sent out an email earlier today, and I certainly echo her sentiments.  For many of us, constraints of time and distance make machine knitting a mostly solitary activity, but get-together's like these are a pleasant reminder of how inspiring it is when we are together to exchange ideas and knowledge.

Everyone hard at work cleaning.

Valerie's machine looking brand new.

Judie's machine, also looking brand new.

Theresa's shiny machine - I thought the lint free paper towel was a great idea (blue roll at the back of the photo)

Michelle's Passap M201 - she made tremendous strides in the time that we had.  Except for one broken gatepost this machine is so soundly built that we don't see any reason that this machine won't sing as well.  We were actually able to find the manual and some YouTube videos to help her out.

The "label" on Michelle's machine.  Except for the handle (which is probably bakelite?) this machine is entirely metal, very heavy, and doesn't seem to be missing anything (except the previously mentioned broken gatepost).

No, I wasn't cleaning yesterday - I brought my Addi to do some demos.  Pictured is the "messy bun" hat I managed during our time at the library.  (The white yarn at the top is waste yarn.).  I do like this little machine, and best of all it is small and light to transport!

For those of you just checking out our blog for the first time, you can subscribe to get notifications emailed to you when a new entry is posted.  I think it depends on what browser you are using as to exactly where on this page that subscribe button is, but it's somewhere in the outer margins of this post, to the right or at the bottom.

So with so much enthusiasm yesterday, we have tentatively booked Saturday, February 11, for a workshop on repairing your sponge bar.  More details will follow once we have the date secured and I've figured out the materials list/cost.  We also tentatively booked Saturday, May 6 for another get together, the theme of which is open for now.  Saturdays book quickly at the library so we wanted to build on yesterday's energy and secure some dates while we were there!  So for now, save the dates, and there will be more information on these, especially February 11, very soon.

Thank you again so much for a great day.  And also, to Judie, Costume and Prop Mistress for Dartmouth Players, all the best on the upcoming show "Don't Tell Mother"!

Nancy

Friday, January 13, 2017

Reminder

Hi everyone!

Just popping in for a quick reminder about the machine cleaning/open house tomorrow, January 14, from 10 AM to 2 PM, at the Musquodoboit Harbour Public Library.  Bring your machine, or your swatches, or your KAL project, and a brown bag lunch.  Dobbit Bakehouse is nearby for coffee and treats.  And the weather is supposed to cooperate (cold but sunny) for travelling!  We hope you can join us.  And watch for the next post on our Hoods Up! KAL soon.

Nancy

Thursday, January 5, 2017

Let’s try this again…correct tension is key


I am using Honiburd Cotton for my Hoodie so decided to start off with Mary Anne’s tension and hope for the same result (27 sts and 36 rows = 4”/10cm). I am, however, using a Brother 940 rather than a Singer machine and experience has told me often that every machine knits at a different tension just like hand knitters do.

So, I made my tension swatch using Tension 9 and it looked great.However, when I measured it I definitely had a looser tension than Mary Anne’s. My tension worked out to 29 sts and 41.74 rows = 4”/10cm. So, not a huge adjustment but I needed a tighter tension.

I set up the machine again and decided to try one Tension setting tighter – 9.1 correct? As soon as I had knit about six rows and looked at the loose tension I realised I had, once again, thought like a hand knitter instead of a machine knitter. I learned to knit on needles that were English sizes (that means the larger the number, the smaller the needle, and therefore, tighter tension). American sizing is the opposite – the larger the number, the larger the needles (machines are the same). Anyway, I whipped the knitting off the machine, rewound it onto the cone, reset the machine in the proper direction (8.2 this time) and started again.
I had decided to try something different this time and, instead of casting on 60 stitches and isolating 40 stitches and 60 rows I decided to cast on 40 stitches and isolate 27 sts and 36 rows (Mary Anne’s exact tension). If things worked out as I hoped, the measurement of the isolated stitches and rows would be 4" x 4”). I’m an optimist.
I finished the swatch and cast off. Now to measure. Hmmm, 27 sts = 3.75” and 36 rows = 3.875”. Too tight.
I was about to sit down with the calculator to work out my changes when I reread the pattern instructions to ensure I had the gauge right. And then it hit me - “after the swatch is washed and dried”. I hadn’t washed and blocked the tension swatch, so off I went to the sink, washed the swatch well, pulled out four tension wires, threaded the swatch and placed it on my three tier drying rack that one of my knitters had given me as a gift. The swatch is now hanging in the stairwell drying. I am hoping to have a nicely dried swatch by noon tomorrow so that when Nancy and I meet to discuss next steps, I will be able to re-measure and at least have the correct tension to work from.


Sunday, January 1, 2017

Laying It All Out - Part 2

Happy New Year!

I'm going to pick up right where I left off before the holidays, which was determining the measurements for the hood and bands.  I mentioned in that post that I had some trouble with the hood - it boiled down to me not reading the pattern correctly.  Taking a break and putting fresh eyes on it later helped me discover my error.

Since I'm not entirely sure that I didn't scare everyone away with that entry, I'll be much briefer this time.  Here you go:


Again, I used the large size in the pattern as written and made note of the measurements that I needed (photo on the left), and then the stitches and rows as written in the pattern (photo on the right).  Once you know the stitches and rows, then the measurements can be calculated using the gauge stated in the pattern.  From these measurements, you can then use your gauge to calculate the stitches and rows that you require.  Or if you are customizing the size, then of course you will use your own desired measurements.  For the details of those calculations, you can go back to the Part 1 entry.

For the cuff and hem bands I took a slightly different approach.  For the cuff band, in size large, the instructions note to cast on 60 sts.  The cuff of the sleeve itself calls for a cast on of 64 sts.  That means that the cuff band is 94% of the actual cuff.  That's the percentage that I will use to determine the number of stitches to cast on for the cuff band.  For the back/front bands, the cast on is 142(71).  That is 88% of the back/front cast on number.  88% will be my magic number for the back/front bands.

The zipper band gets measured against the actual zipper.  I'm going to wait until I have my front pieces knit and my zipper in hand before I do anything with that number.

So I now have all the information that I need to convert the Hoods Up! pattern to my machine, a Studio SK860 mid-gauge, and my yarn, Patons Astra.  I have my tension swatch done and measured, and I have the pattern shapes and all the necessary measurements of each piece of the garment that I want to make.

At this point, there are a number of different software programs that you could use to do the rest of the math for you.  I am somewhat familiar with Garment Designer and Design-a-Knit, and I note that a quick Google search of "knitting software" yields quite a few results, although many look like charting aids and not actual pattern generators.  Are there any programs that you use that you would like to recommend?  If so please drop a comment below!

In the meantime, I'm off to complete the last step before I finally get this project to the machine, and that is to convert the instructions to my machine and yarn using the measurements I calculated and gauge from my tension swatch.  Let me know in the comments if (a) you want a detailed account of that or (b) your eyes will roll back in your head with one more math post.

Also, please let me know if there is another, better way that you use when you want to convert a pattern.  I'm here to learn too, and being, for the most part, self-taught, I find it's easy to miss the obvious and more direct methods sometimes!

I'm not usually much for New Year's resolutions, but I do hope to make more time for my machine and more creative pursuits in 2017!

Nancy