I'm going to pick up right where I left off before the holidays, which was determining the measurements for the hood and bands. I mentioned in that post that I had some trouble with the hood - it boiled down to me not reading the pattern correctly. Taking a break and putting fresh eyes on it later helped me discover my error.
Since I'm not entirely sure that I didn't scare everyone away with that entry, I'll be much briefer this time. Here you go:

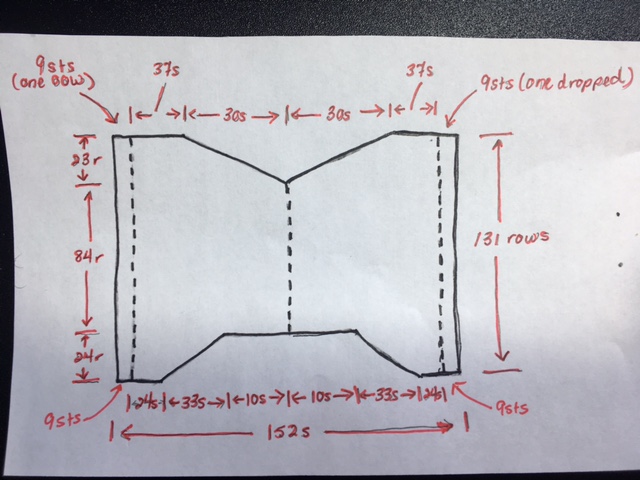
Again, I used the large size in the pattern as written and made note of the measurements that I needed (photo on the left), and then the stitches and rows as written in the pattern (photo on the right). Once you know the stitches and rows, then the measurements can be calculated using the gauge stated in the pattern. From these measurements, you can then use your gauge to calculate the stitches and rows that you require. Or if you are customizing the size, then of course you will use your own desired measurements. For the details of those calculations, you can go back to the Part 1 entry.
For the cuff and hem bands I took a slightly different approach. For the cuff band, in size large, the instructions note to cast on 60 sts. The cuff of the sleeve itself calls for a cast on of 64 sts. That means that the cuff band is 94% of the actual cuff. That's the percentage that I will use to determine the number of stitches to cast on for the cuff band. For the back/front bands, the cast on is 142(71). That is 88% of the back/front cast on number. 88% will be my magic number for the back/front bands.
The zipper band gets measured against the actual zipper. I'm going to wait until I have my front pieces knit and my zipper in hand before I do anything with that number.
So I now have all the information that I need to convert the Hoods Up! pattern to my machine, a Studio SK860 mid-gauge, and my yarn, Patons Astra. I have my tension swatch done and measured, and I have the pattern shapes and all the necessary measurements of each piece of the garment that I want to make.
At this point, there are a number of different software programs that you could use to do the rest of the math for you. I am somewhat familiar with Garment Designer and Design-a-Knit, and I note that a quick Google search of "knitting software" yields quite a few results, although many look like charting aids and not actual pattern generators. Are there any programs that you use that you would like to recommend? If so please drop a comment below!
In the meantime, I'm off to complete the last step before I finally get this project to the machine, and that is to convert the instructions to my machine and yarn using the measurements I calculated and gauge from my tension swatch. Let me know in the comments if (a) you want a detailed account of that or (b) your eyes will roll back in your head with one more math post.
Also, please let me know if there is another, better way that you use when you want to convert a pattern. I'm here to learn too, and being, for the most part, self-taught, I find it's easy to miss the obvious and more direct methods sometimes!
I'm not usually much for New Year's resolutions, but I do hope to make more time for my machine and more creative pursuits in 2017!
Nancy
Hello, is anyone working on theie hoodie?I am at the point on the back where to decrease for underarm and am stuck there, don't understand the next few steps,The steps in brackets are confusing,if anyone can tell me how to proceed ,I wouls appreciate it,and do we decrease both sides at the same time,I am assuming we do.
ReplyDeleteHi Pat - yes, you do decrease on both sides at the same time. I've just finished the back and 2 front pieces and am about to do the sleeves. I'll also be catching up the blog entries this weekend so keep an eye out for that over the next day or so and there may be information in my entry on the back that will help.
Delete