Feeling unusually energetic last evening after a long day at the office, I decided to tackle a pocket so I could get another blog entry posted. Okay, actually, I found this great image earlier in the week with the word "pocket" in it that related to St. Patrick's Day, so the pressure was on to be able to use it in a timely manner.
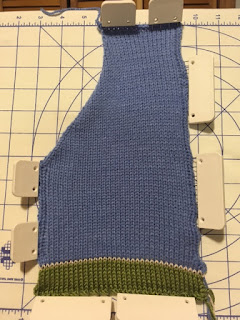
The pocket is basically a rectangle with a triangle-shaped bite taken out of the corner. Unlike most of the other pieces of the hoodie, when it is completed there are no live stitches - the cast on and cast off edges are closed using the chain cast on and chain cast off methods. My go-to cast on is usually e-wrap or double e-wrap, and my favourite cast off is latch tool, so I'm quite out of practice with other methods. This became apparent right away as my chain cast on for this piece is WAY too tight (I did better with the cast off). You can't really tell from the picture below, but let's just call this particular pocket a practice piece.
I've just pinned it out temporarily so it could be photographed sort of flat, and the lighting was not the best again. On the left and right sides of the pocket, before the decreases, the third needle from the edge is placed out of work to provide a channel for chain stitching the pocket to the front. We'll save that discussion for future entries about assembly of the hoodie.
You may look at the bottom and see the waste yarn and ravel cord and think - wait, the stitches at the bottom are still open. The waste yarn in this case really just provides a place to hang weights. There is a chain cast on right after the ravel cord, but it only shows in the wrong side - once I take off the waste yarn it will be visible. In any case, it is too tight even though it doesn't really look it in the picture.

The other part that I feel I need to address is the "curl" on the diagonal edge. This is the part of the pocket that remains open, so it won't be sewn down to wrangle that curl into submission. It might block out, but I am knitting with inexpensive acrylic, so it might not either. That got me thinking about about ways to stop that curl on the edge of stockinette stitch.
I vaguely remembered a hint for just such a problem at a machine knitting seminar one time, so I dug out my notebook that I always used for the seminars and lo and behold I found it. At the September 2013 Maritime Machine Knitters' Seminar in Truro, Mary Anne was our presenter. She showed us a way to do an automatic edge finish to stop the curl by engaging the ribber and putting four to six stitches on the edge(s) into work to create a built in facing that stops the curling. The notes I made also say "also called automatic facing, #53". So, yay me for taking notes, but boo for not taking a bit more detailed notes that I can decipher more than three years later. I'm assuming that "#53" means Knitwords Issue #53, however all of my back issues are packed away in storage so I can't check. I also have another note below that that says "Knitwords #46, 'Dress Code' - facing example". That one is a little more clear, so if anyone has that issue have a look.
I will definitely be trying this technique the next time I have a piece that needs an uncurled edge, but because this particular edge is diagonal, and I was doing a decrease every third row, that would mean also moving the ribber stitches in as well, and I'm feeling just a little bit lazy for that if there's another way. So I did what anyone would do and googled "stopping edge curl in knitting" or some words to that effect, and I found, in the comments of this web page, the following: "Before you start knitting, cut two long strands of matching yarn. As you are knitting, e-wrap 3-5 stitches on each edge. It sort of makes a selvedge as you knit". This satisfies my laziness and seems like a very simple way to create a narrow facing that will stop that edge curl. It's basically the same thing as using the ribber, but by hand instead - it creates a thicker edge that will prevent it from rolling back on itself. I will try both methods and report on my experience in a future post.
That's about it, for now anyway, on the pockets. May your pockets be even and flat and your edges not curl!
Nancy


Hey Nancy, I'm finally catching up to your blogposts. Just wanted to say, about the edge of the pocket, it seems like you don't really trust me, but that full-fashioned shaping doesn't really require anything extra - I have made dozens of pockets this way and never felt a need to do anything else to it - sincerely!
ReplyDeleteThat's good to know, thank you!
Delete