Friday, March 17, 2017

Hot Pockets

Happy St. Patrick's Day!

Feeling unusually energetic last evening after a long day at the office, I decided to tackle a pocket so I could get another blog entry posted.  Okay, actually, I found this great image earlier in the week with the word "pocket" in it that related to St. Patrick's Day, so the pressure was on to be able to use it in a timely manner.

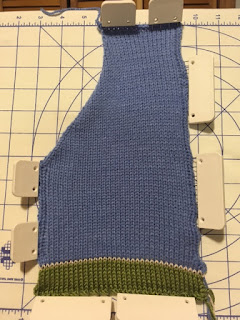
The pocket is basically a rectangle with a triangle-shaped bite taken out of the corner.  Unlike most of the other pieces of the hoodie, when it is completed there are no live stitches - the cast on and cast off edges are closed using the chain cast on and chain cast off methods.  My go-to cast on is usually e-wrap or double e-wrap, and my favourite cast off is latch tool, so I'm quite out of practice with other methods.  This became apparent right away as my chain cast on for this piece is WAY too tight (I did better with the cast off).  You can't really tell from the picture below, but let's just call this particular pocket a practice piece.

 I've just pinned it out temporarily so it could be photographed sort of flat, and the lighting was not the best again.  On the left and right sides of the pocket, before the decreases, the third needle from the edge is placed out of work to provide a channel for chain stitching the pocket to the front.  We'll save that discussion for future entries about assembly of the hoodie.

You may look at the bottom and see the waste yarn and ravel cord and think - wait, the stitches at the bottom are still open.  The waste yarn in this case really just provides a place to hang weights.  There is a chain cast on right after the ravel cord, but it only shows in the wrong side - once I take off the waste yarn it will be visible.  In any case, it is too tight even though it doesn't really look it in the picture.


The other part that I feel I need to address is the "curl" on the diagonal edge.  This is the part of the pocket that remains open, so it won't be sewn down to wrangle that curl into submission.  It might block out, but I am knitting with inexpensive acrylic, so it might not either.  That got me thinking about about ways to stop that curl on the edge of stockinette stitch.

I vaguely remembered a hint for just such a problem at a machine knitting seminar one time, so I dug out my notebook that I always used for the seminars and lo and behold I found it.  At the September 2013 Maritime Machine Knitters' Seminar in Truro, Mary Anne was our presenter.  She showed us a way to do an automatic edge finish to stop the curl by engaging the ribber and putting four to six stitches on the edge(s) into work to create a built in facing that stops the curling.  The notes I made also say "also called automatic facing, #53".  So, yay me for taking notes, but boo for not taking a bit more detailed notes that I can decipher more than three years later.  I'm assuming that "#53" means Knitwords Issue #53, however all of my back issues are packed away in storage so I can't check.  I also have another note below that that says "Knitwords #46, 'Dress Code' - facing example".   That one is a little more clear, so if anyone has that issue have a look.

I will definitely be trying this technique the next time I have a piece that needs an uncurled edge, but because this particular edge is diagonal, and I was doing a decrease every third row, that would mean also moving the ribber stitches in as well, and I'm feeling just a little bit lazy for that if there's another way.  So I did what anyone would do and googled "stopping edge curl in knitting" or some words to that effect, and I found, in the comments of this web page, the following:  "Before you start knitting, cut two long strands of matching yarn. As you are knitting, e-wrap 3-5 stitches on each edge. It sort of makes a selvedge as you knit".   This satisfies my laziness and seems like a very simple way to create a narrow facing that will stop that edge curl.   It's basically the same thing as using the ribber, but by hand instead - it creates a thicker edge that will prevent it from rolling back on itself.   I will try both methods and report on my experience in a future post.

That's about it, for now anyway, on the pockets.  May your pockets be even and flat and your edges not curl!

Nancy


Tuesday, March 14, 2017

Welcome to the Hood!

I've jumped ahead a little bit because I was anxious to see how the hood is done.  In order to get clear in my head how to do it, I read carefully through the instructions and made myself a rough sketch below of the direction of knitting.  The green "S"s are starting points with new yarn, the orange "X"s are where the knitting ends and the working yarn is broken.  The red line is the direction of knitting.   If my sketch just looks like a very poorly thought out map of a corn cob maze, then just forget you saw it and skip on down to the actual pictures below.


In the photo below you can see I have just completed the bottom shaping and am ready to start knitting the "straight stretch" up to the bottom of the "V" where more shaping is required.  You can clearly see the concave curve that has been created, particularly if you ignore the creative mess behind it that is my knitting machine table.


Below is a photo of the first half of the bottom concave curve completed.  


This bottom curve, with live stitches, will be attached to the neck edge of the body of the hoodie on the machine, so having a neat and smooth curve enhances the finished look.

Here's a photo of the finished hood, or most of it anyway.  It's a bit larger than my little little blocking board so I just pinned out flat the key parts for you to see.  The colour is off a bit as it was evening when I took the next two photos, in a different room with a different light bulb - I didn't suddenly switch to a different yarn!


I see that I didn't pin it very straight but I was just trying to get the photo, not actually blocking the hood yet.  At the top, you can see that one half is taken off on waste yarn at a time since for the top shaping we are back to short row decreasing instead of increasing (as we do for the bottom), and as when decreasing for a neck, one side is done and scrapped off and then the second side is done.  The top, live, stitches will be grafted one side to the other to close up the top of the hood.  Imagine a vertical fold line at the centre of the picture above.   Each half of the hood opening that frames the face is to the far right and left.


The picture above is a close up of one side of the hood front where the cord casing is formed.  There is a needle taken out of work on each side of the hood, for me the sixth stitch in from the edge, which creates a fold line.

So that is the hood piece knit.  I have the two pockets left, assembly, and the bands to do.  And a zipper to purchase.

If you have any questions or comments don't be shy!

Nancy


Saturday, March 11, 2017

Hearts on Sleeves

"I like to accessorise shirts with a little ribbon tied round my collar or a country style ascot. I've also sewed little hearts on some of my sleeves which I've done for years because I always wear my heart on my sleeve so if you see a little embroidered heart on my clothes, that's why!"


Jessica Brown Findlay
Lady Sybil, Downton Abbey


I wasn't able to find a picture of Jessica with a heart on her sleeve, but as a mom of a nurse, a Red Cross is almost the same thing in my mind!

The next pieces of our hoodie are the sleeves, and no, I haven't embroidered any hearts on my sleeves.  But there would be nothing to stop us if we wanted to!

The main technical feature of the sleeve is again the short-row shaping, and also use of the garter bar (if you have one, or how to get around that if you don't).  Here is my finished, but clearly unblocked sleeve.

The top curve of the sleeve is achieved entirely with short rowing and then hold is cancelled and one row is knit, the piece is taken off on a garter bar and turned, and one final row is knit before the being scrapped off with waste yarn.  At the peak of the cap, I had just 2 stitches still in work (all the other stitches to the right and left were in hold), so therefore the working yarn was smack dab in the centre of the piece.  I scratched my head over that for a few minutes wondering how to get the carriage fully to the right or left so I could knit across all needles at once.  The only solution I could come up with was to break the working yarn, move the carriage to the right, and reattach the working yarn so I could knit all the stitches of the shoulder cap across the entire row in one motion.  If I missed something obvious to everyone else but myself, please don't be afraid to point it out to me!

For the next, and final, row, since I don't have a garter bar for my mid gauge machine, I had two options - I could have scrapped off the piece, turned it and rehung it to knit the final row, or I could reform the stitches on that last row with my latch tool.  I chose the latter and am happy with the results.  Below is a close up of the top of the sleeve.

If you look closely, you can see the "purl" row immediately before the white waste yarn starts.  This is a nice, neat detail that I've not done on a sleeve cap before.

I'm not sure what else to say about the sleeves, honestly.  If you have any questions we'd be happy to try and answer them, but otherwise, I'm sure most of you are very familiar with sleeve knitting.

I do have another word or two about the back and front pieces.   First, a confession - I've gone a bit "rogue" on this pattern and paid more attention to the schematics and measurements and my gauge than I have to some of the finer details of pattern itself.  Well, I didn't think I had, actually, until it was brought to my attention that on the shoulders, it's not just the shoulder slope that is short rowed but also the shoulder's neck edge.  Here's a close up of my shoulder again as a reminder.


You can see quite plainly that I decreased the shoulder neck edge and short rowed at the top of the shoulder.  I also scrapped off the back of the neck (green waste yarn) and haven't cast those off as it calls for in the pattern directions.  I can easily rehang the back of the neck and cast those off, but to change the shoulder neck edge I would have to unravel it down to the start of the decreases and do that over.  For the time being I'm going to leave the shoulder neck edge as it is, though.  Since they are meant to be left as "live" stitches like the top of the shoulder, this may get me into a bit of trouble when it comes time to hang the hood, but I will take one for the team so you can look forward to watching me wiggle my way out of that one when the time comes.  Problem-solving skills are definitely an asset when working with our knitting machines!  And improvisation.

Finally, we have booked the local library for Saturday, May 6, 10 AM to 2 PM, and are welcoming ideas for workshop topics, quick projects we can knit together in that time (we do have an idea on that but will keep you in suspense for just a bit longer) and a suggestion that maybe this would be a perfect time for a wrap up and show and tell on our hoodie projects.  I will post more reminders and more details as the time gets closer, but please give us your feedback in the comments below so we can have time to do any research/planning that might be necessary.

I hope that you are getting as much out of this blog and project as I am.  But if you haven't had time to start yet, don't fret.  Remember - we started this project in 2014.  Read along anyway and you'll get to it when, and if, the time is right.  We did!

Nancy


Tuesday, March 7, 2017

Abbreviations and Blogger Tips

A rare mid-week post from yours truly on a couple of housekeeping items.  We had some feedback regarding abbreviations used in the pattern.  If you have a copy of any Knitwords magazine, a key to the abbreviations is usually near the front of the magazine.  If you don't, I found this handy key on Eileen Montgomery's site here.

I also thought I'd provide some tips on how to get the best use out of this blog, in case you're new to following blogs.  The word blog is short for "web log", and they are generally a type of online diary or journal that anyone can start with ease on any topic that they choose.  There are a lot of machine knitting blogs out there!

First off, if you're reading this post in an email notification, I think you may get more out of the blog in general if you go directly to the web page, which is mkkal.blogspot.ca.    Depending on the browser you use (Safari, Explorer, Chrome, Firefox, etc), and the device you are using (desktop, laptop, tablet or smartphone), the page may look somewhat different, but all the elements should be there somewhere.  I'm a Mac user, so I view most blogs on Safari, so that will be the example that I will use.  The picture below is what I see when I open the web address on Safari.


I zoomed out a bit on the view to take that screenshot so you could get an overview of what it looks like.  What will show is the most recent entry, and depending on the length of that entry you will likely have to scroll down to see the end of it and the start of the previous entry.  If you click on the title of any particular entry then just that entry shows up on the screen, no previous ones.

The next screenshot, below, shows a zoomed in view of the most recent entry.


At the very top is the name of our blog, "Adventures in Machine Knitting".  Next is a brief description of the "mission" of the blog.   The white space contains the blog entries themselves, with the title of the entry at the top.  The grey space at the top shows the date the entry was posted.  The grey sidebar to the right, a fixed feature no matter which post you are viewing, is the important part that you're missing when you don't visit the blog itself.

First up is the list of contributors.  You'll note that there are three contributors.  Ciobair, and nlobban, are both me.  Ciobair is a pen name I use, and it's the Gaelic word for shepherd.  My Gaelic pronunciation is left wanting, but it sounds very much like the English word "Keeper".  It was actually the nickname for my grandmother's family of Camerons, who were known locally as the "Keeper or Ciobair Camerons" to distinguish them from many other Cameron families in the Antigonish and Guysborough area (the Scots love nicknames!).  But I digress.  Lynne is our other contributor.  I'll show you later, below, how you can tell which one of us was the author of a particular post.

Still referencing the screenshot above, the next section in the grey sidebar is titled "Blog Archive".  This is how you can access previous entries we have made.  You can see that they go back to 2014.  We flatter ourselves, I'm sure, to suggest that you might want to go back to the beginning and read all our entries chronologically, as well as the comments we have received, but I'll suggest it anyway!  For 2014, you'll see the number four in brackets - that means that in 2014 there were four blog posts.  Nothing for 2015, and then we ramped back up in 2016 with sixteen entries.

The next section is "Links We Like", which I think is self explanatory, and is just a random assortment of, well, links we like!  Feel free to give us suggestions for more if we've missed something.

The picture below is a screenshot where I have scrolled down to the bottom half of the entry, on the same page as the entry above.


The next section is "Subscribe to our Blog".  The two drop-down menus entitled "Posts" and "All Comments" give you a choice of subscribing either through NetVibes, My Yahoo, or Atom.  I confess that I am not familiar with NetVibes or Atom, but I think they are basically news aggregators where you can collect notifications from all your favourite blogs in one spot.  I actually use an App called "Bloglovin" to subscribe to and read my favourite blogs.  There are many out there, or you can just visit blogs directly as I described at the top of this entry.

The last section of the grey sidebar is "Follow By Email", which I believe many of you have done, which sends new blog entries directly to your email inbox.  

The screenshot below is the final section, as I scrolled down, of the most recent entry.


The section at the very bottom of the entry shows which contributor posted the entry, in this case Ciobair (me), and the time of day that it was posted.   In this entry the time of day was accurate I think, but some of them have been the wrong time zone for some reason.  Not a detail that matters for us really.  One thing we have noticed, however, is that it takes about six hours from the time that a post is published to the time that an email goes out to subscribers informing them that there is a new post.  I find that a bit curious why there is such a time delay, but it's not anything I have control over as far as I can tell.  Immediately to the right of that you can see that no one has commented on that entry yet.  If there were comments, it would indicate how many and you could click on that link to read them and make a comment yourself.

Below that is a row of little icons showing different social media outlets on which you can share the blog entry.  If you hover your mouse over each one it will name it if you don't recognized the icon.  From left to right they are, share by email, BlogThis!, Twitter, Facebook, Pinterest and Google Plus.

So that's a basic tour of the blog and how to use it.  As always, if you have any questions or comments, let us know in the comments below.  I expect to have the next entry out, for the sleeves of the hoodie, on the weekend.

Nancy


Saturday, March 4, 2017

Back to Front


I'm not sure I necessarily agree with Ms Vreeland on this, nor do I think it would hold true for the hoodie, but since we're finally going talk about the back and front pieces of the Hoods Up! project, I thought a quote about backs and fronts of sweaters would not be amiss.

Pictured below are my back and front pieces, unblocked obviously, so apologies for the curled state of the pieces.  The front pieces are really just the back knit in two halves, so the discussion below will apply to all pieces.


The main technique used in the back and front pieces that may be unfamiliar to some is short-row or sloped decreasing.  This is used at the underarms and shoulders to avoid the "stepped" cast off, and makes a smooth curve or slope that makes for better seaming in these areas.  In the picture below you can see a close up of the underarm of my hoodie, and see that the slope is gradual and smooth.


In Susan Guagliumi's book, Hand Knits by Machine, she describes short row decreasing as follows:  "Placing needles into HP acts like decreasing in that the row length gets shorter and shorter while the stitches themselves remain live and available.....and can be bound off or scrapped off as a group."  For more discussion on how to bind off the stitches (at the underarm) see my previous post here.

Below is a closer picture of the shoulder of my hoodie.  Note that the shoulder stitches are not bound off like the underarm.  Instead, once all of the hold "decreases" are completed to achieve the slope, one final row is knit with hold cancelled and then the shoulder is scrapped off.  This will make rehanging the shoulders for seaming much easier and much neater.


Another resource for more information on short rows is Regine Faust's book, Fashion Knit Course Outline for Hand Knitting Machines.  I think this book is long out of print, but you might be able to find it at the library or a second hand source.  Hopefully for less than the price that the Amazon link quotes.

I've also already mentioned in a previous post Mary Anne's recent book The Handbook for Manual Machine Knitters as another great resource.  And for those of us who are more visual learners, YouTube is a terrific resource to view techniques in action.  Diana Sullivan has a large number of machine knit how-to videos on her YouTube channel here, and there is a link to her blog on the sidebar to the right under "Links we Like".

We found it helped our understanding immensely to practice on a swatch, as I described in my last post, and encourage you to do the same.  Let us know how you're making out, or if you have questions, or other resources or links to share.

Next up will be the sleeves!

Nancy