Sunday, August 27, 2017

Sidetracked

I started a hand knitting project a couple of months ago that is intended as a house warming gift for a friend who has already been in her new home for a little bit more than a couple of months, so I'm feeling some pressure (self imposed of course) to get this project done and delivered.  I do think this is an absolutely perfect house warming gift for my friend, who is originally from Ireland, and who I'm pretty sure does not read this blog (I hope not anyway!), so I think it will be worth the wait!

The project is an afghan called Stornoway (yes, I know that's in Scotland not Ireland), designed by Anita Grahn, which you can see here on Ravelry.  Below is one of the pictures included with the pattern, from the Ravelry site.


So first off, let's just take a moment to admire how gorgeous this is and, ahem, how crazy ambitious I was to think that I could complete this in a reasonable amount of time (in the heat of summer).  And do not think that I didn't seriously consider knitting this on the knitting machine before I started, because I definitely did consider it - hard, but in the end ruled it out for a number of reasons that I'd like to share with you.

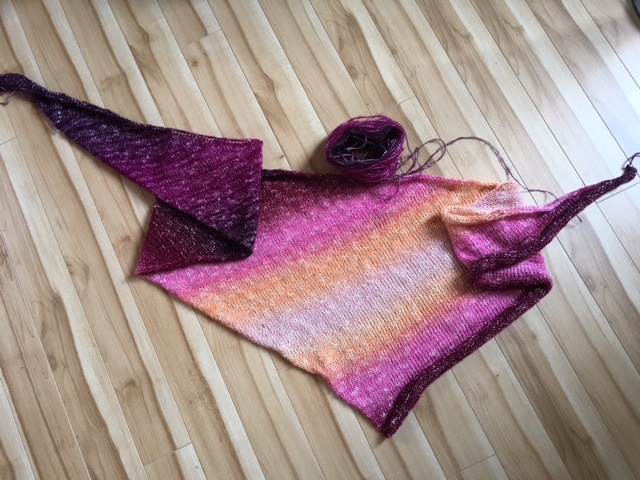
Before I do that though I'll briefly share a bit about the construction of the afghan.   The centre rectangle, or body of the afghan, is knitted first - you can see from the pictures above and below that it is a type of textured checkerboard pattern.  The cables are part of a wide border that is knit all the way around the perimeter once the rectangle is complete.  The corners of that cable border, which are exquisitely designed, are achieved with short rows (while at the same time maintaining the cable pattern).  NO ONE is allowed to talk to me when I'm turning those corners unless they or the house is on fire.  Thankfully there are only four corners, and I've now completed three.  Here is my progress as of this morning.


At the very top of the picture above is the beginning of the border (the white yarn is a temporary chain cast on), and obviously at the bottom of the picture where the stitches are still on the needle is where I am currently working - so just a few more repeats of the pattern, one more corner, and then I graft the end to the beginning.  The knitting needle that appears in the photo up the side of the body of the afghan is holding live stitches - one of which is knit together with a border stitch every other row.  That should give you a general idea of the construction of the afghan.

I have had plenty of time as I have worked my way through this project by hand to review my decision about whether or not it would have been possible and/or worthwhile to knit this afghan by machine, so let me share some of those thoughts with you to hopefully inspire a conversation.

Yarn was the first consideration - I knit this with the exact yarn called for in the pattern, and in the exact colour the model was knit, which was Knit Picks Wool of the Andes, in Noble Heather.  This yarn is 100% Peruvian Highland Wool and according to the ball band knits up at 4.5-5 sts = 1" on #6 to 9 needles (4.0 to 5.5 mm).  So for my mid gauge machine this is an ideal weight.

The second consideration was just practical - do I even have enough needles available on the needle bed to accommodate the body of the afghan?  No problem there - the cast on is fewer than 150 stitches.

The third consideration was the checkerboard textured pattern, which is basically alternating squares of stocking stitch and garter stitch.  The garter stitch squares would have required me to reform about half the stitches on every other row.  Not really a big deal with a multi-pronged tool.  Or you could just knit a plain rectangle and forget the checkerboard pattern, but I like it and didn't want to do that.

The fourth consideration was that the pattern instructions for the body of the afghan required that you knit the body to a certain length without actually telling you how many rows or pattern repeats that would require.  That's not uncommon with hand knit patterns, but is my only criticism of this pattern.   It is essential to get that number right on this pattern because after you complete the rectangle you then have to pick up a specified number of stitches all along the perimeter, as these live stitches are what you use to connect the border with the body of the afghan.  And that specific number of perimeter stitches is because there is a specific number of cable pattern repeats around each long and short side of the rectangle.  So I consulted the comments on Ravelry, and did some math, and was able to determine the correct number of rows/repeats for the length of the afghan body in order to have enough rows to pick up the number of stitches I needed.

So I think I actually could have knit at least the body of this afghan on the machine without any trouble, and if I were to ever knit it again (and I would not rule that out as a possibility), I definitely would.

The cabled border, however, is quite another issue.  Cables are certainly possible on the knitting machine, but with this pattern, as you can see from the photo, there is a LOT of cable crossing.  And then there is the matter of the live stitches on the perimeter to which the cabled border is attached.  I think you could dispense with those live stitches and just hang a selvedge stitch from the side every other row, or you could just knit the cabled border on its own and seam it to the body.  And the short-rowed 90 degree turns - again certainly possible on the machine but I'm not sure it would be any faster than hand knitting?  My conclusion - definitely yes to machine knitting the rectangle body of the afghan, and maybe try a swatch of the cabled border on the machine to see how tedious it might be to actually execute.  But my intuition says stick to hand knitting for that part of the project.

What do you think?  If you're a hand knitter as well as a machine knitter, have you ever spent your entire project time on a hand knit thinking about how you could have machine knit it instead?

Nancy


Thursday, July 13, 2017

Drink in the Wild Air

Summer is well under way, and before I get back to the shawl project (which I hope to very soon, so stay tuned), I just wanted to share a few random knitting and non-knitting things that might be of interest.  For many of us (but not all, I know) summer is a great time to catch up on that pile of books awaiting us on our nightstands, or get outside and enjoy our gardens, or maybe head out on a road trip.

First up, if you're a podcast listener like I am, I have just stumbled upon what may be the one and only machine knitting podcast (please let me know if there are others!).  There are many, many hand knitting podcasts and vidcasts, but the only one that I have ever come across about machine knitting is Hand y Machine Knitting Podcast.  Since I've just found it, I'm only a few episodes in, but so far I'm impressed.  Podcasts are great to listen to in the car on a summer road trip, or while you're out for a walk or working in your garden.  Give it a listen!

Summer is definitely a time that I catch up on my reading.  For fiction, I've just finished Stephen King's 11.22.63 .  If you're a Stephen King fan you've probably already read it as it's been out since 2011, but if not and you have an interest in non-linear time and the consequences of interfering with the past, or even just an interest in the Kennedy era and his assassination, all of which I would tick on my box of interests, then this book will not disappoint.  The other book I recently finished was by a local (Eastern Shore) author Genevieve Graham, called Promises to Keep.   This is a perfect summer read, and Genevieve is a very lovely and talented lady!

For machine knitting book recommendations, I highly recommend Susan Guagliumi's books, Hand Manipulated Stitches for Machine Knitters, More Hand Manipulated Stitches for Machine Knitters, and Hand Knits by Machine.  The books are well laid out and filled with many colour photos, and include both techniques and full patterns.  An upcoming episode of the podcast I mentioned above includes an interview with Susan, so I am very much looking forward to that.  I say "upcoming" but it's actually an episode from February 2015 - I just have some catching up to do!

Another book that I've just recently finished (I told you - I catch up on a lot of reading in the summer!) is Julia Cameron's book It's Never Too Late to Begin Again.  The focus is on a reader audience that is moving toward, or in, retirement and looking to get in touch with their creativity.  Each chapter includes weekly exercises, but the book can certainly be just read for inspiration.  There are many inspiring stories of people who found creativity and reignited interests that had been cast aside during their working years.  There are great exercises included for re-filling your creative well.  One of the best is the author's suggestion to take yourself on an Artist Date every week.  This is one I've done several times, and she stresses that it doesn't have to be a visit to a museum or gallery - it could be something entirely different that could still fill the well.  My most recent Artist Date was reconnecting with an old friend and seeing what creative stuff she is up to after many years in the business world.

There's nothing to say that it can't be a visit to a museum or gallery though, and I'd like to recommend that if you're in Halifax between now and July 28, go see Liza Hageraats show "Matted Tails and Felted Feathers" at Gallery Nineteen Nineteen.  Liza is an acquaintance of mine and a very talented artist, and although I haven't gotten in to the city to take in the exhibit yet, it is definitely my next planned Artist Date!

Finally, if you're looking for a summer road trip, or ideas for your own Artist Dates, let me suggest Highway 7 along Eastern Shore.  We have so many gems here.  To name just a very few:  Old Anderson House (local crafts), The Freight Shed (crafts) and Musquodoboit Harbour Railway Museum, Dobbit's Bakery, Martinique Beach, Old School Art Gallery, Uprooted Cafe, Bonita's Kitchen, Jeddore Variety (yarn and knitting needles), Webber's Store, Norse Cove Cafe, Taylor Head Provincial Park, Sober Island Brewery, Liscomb Lodge, and Sherbrooke Village.  You can find most of these businesses or places on Facebook, or get more information on the Seacoast Trail website, or on the Destination Eastern and Northumberland Shores website.


Have a lovely, creative, book- and podcast- and road trip-filled summer (if that's what floats your boat like it does mine), but however you do it, refill that well!

Nancy


Monday, July 3, 2017

Shawl in a Ball Project

In my last post I introduced a project I've been wanting to try ever since I read about it here, something a little less technical than the last project.  If you haven't read that introduction, best to go back and read that first, here.

I laid out my plan to go through my books and online resources for some simple lace patterns, and then make a swatch.  I did do the first part of that, but as I got (over)thinking about the actual shawl itself and the fact that it is knit on the bias, with increases on every row and decreases on every second row, I thought maybe I would just give myself a little break and just knit the first one to get a little experience on the mechanics of knitting the shawl first before I got too fancy.

And since I was pretty sure of what tension I'd be using (8), I then decided to dispense with doing the swatch completely and just dive right in.

I used the "Community Coral" colourway, and wound it up for my machine.  Here is what it looks like ready to knit:


The general pattern I used was as follows:  when the carriage is on the left, decrease on the left by moving the two edge stitches one stitch to the right, and increase on the right by moving the two edge stitches one stitch to the right, and leave the empty needle in working position to create an eyelet.  When the carriage is on the right, just do the increase.  This effectively means that you are increasing one stitch every other row, and creating the biased shape on the alternate rows.  This also creates a shawl with a asymmetrical point.

Here is my shawl early along in the process:


Once you get into a rhythm, and without any interruptions, it goes along fairly quickly at first.  You can certainly see the effect of the biased fabric as the point curls around itself.  But then just as you are getting into a pretty good rhythm, you end up over on the right side of the bed with no more needles available on which to increase, so it's time to move the work all the way over to the left.


So to do that I did a few rows of waste yarn (blue, in case that's not obvious), and rehung the stitches starting at the far left.  Altogether I had to do this about four times, and with each consecutive time there were, of course, more and more stitches to rehang, and fewer and fewer rows between each move as the shawl took up more of the bed, so progress slowed down considerably.  It occurred to me fairly quickly that I was probably going to run out of needles before I ran out of yarn (150 needles on a standard bed as compared with 200 I think on a standard?), and I was indeed correct.


While this was at first quite annoying (what am I going to do with 20% +/- of a ball?), I decided that the best solution for not wasting it would be to at least partially fringe the shawl.  So that is what I will do.

Here is a picture of the shawl off the machine, ready to finish, fringe and block, and the yarn I had left over.


The longest edge (top edge in the photo) I estimate to be about 7 feet from point to point (unblocked).  I think I will put the fringe on the shortest edge (the diagonal edge on the right in this photo).  Total knitting time (including scrapping and rehanging) I estimate to be about 4 - 5 hours (I didn't keep a stopwatch, and I worked on it over a couple of days as time permitted).  When I get the finishing done I will be sure to post a photo!

And what about the lace, you ask?  Well, I have two more balls left, so I think that on at least one of those I will do a very simple eyelet lace, and I will do it when I see the colour start to change, and stop at the next colour change, and so on.  That's the plan right now anyway, always subject to change!

If anyone else is working on this project, I'd love to hear about your experiences/ideas in the comments below!

Nancy

Sunday, June 18, 2017

Preview


A while back Judie shared a blog entry about a "Shawl in a Ball" hand knit project that a machine knitter adapted and blogged about.  The project really caught my eye, and I thought I would share information about it now to give anyone who might be interested an opportunity to read about it, and if interested get a bit of a head start.  It is a lighthearted, creative and simple shawl where gauge doesn't really matter (except in terms of drape) and you're finished when you run out of yarn!

So first, have a read through the blog entry here.

The yarn is from Lion Brand, I bought mine locally at Michael's (around $12-ish per ball I think?).  The colourways are beautiful - you can see them here.  It's 58% cotton, 39% acrylic, and 3% "other" and the gauge on the ball band suggests 17 stitches/25 rows per 4" with 5.0 mm needles.  Because the pattern is more a guideline than a pattern ("I also did lace rows whenever I felt like it"), you could pretty much use any yarn that you like.  Gauge doesn't really matter in terms of achieving specific measurements, what is of more importance is the "drape" or "hand" or the fabric, which for shawls is generally, well, "drapey".

So that's my next project plan, and I'd be happy if anyone wants to follow along or knit along, or just read along.  To prepare I plan to make a swatch, check out some hand manipulated lace patterns in the books I have or online, add those to my swatch to experiment, and then just go for it.   So just one playful swatch and then right on to it.

Because my machine is a midgauge, and I'm primarily a hand knitter, so my stash is almost exclusively hand knitting yarns, I made myself a chart to help figure out the machine gauge that I should start with based on the hand knitting recommendations.  My chart tells me that the tension dial for a yarn gauge of 17 sts per 4" should be around 8 or 9, but I note that the blogger on Knitting Paradise (does anyone know her name?) was able to do the shawl on a standard gauge at tension 10, which she reported to be not quite as loose as she wanted, but she was able to block it out.  So I may find 8 or 9 too loose.  We'll see when I do the swatch.

I would love to upload the PDF of my chart, or cheat sheet, but it appears that I will have to learn how to use Google Docs first, so that's not going to happen tonight, no matter how easy it might be.

So let's have some fun!  I won't actually get to this for a few weeks I don't think, so feel free to work ahead of me!  In the meantime, in keeping with the Monty Python/John Cleese theme, I leave you with these words of wisdom.


Nancy


Wednesday, June 14, 2017

The Finished Hoodie

It was a beautiful day today for washing and blocking my hoodie and setting it outside on the deck to dry in the breeze, so that is exactly what I did.  So I present to you the finished hoodie.


Many thanks to Mary Anne Oger for giving us permission to share this pattern with knit-a-long participants, and for providing feedback as we worked through the process.  And thank you to everyone who knit along with us, or just followed the progress as we reported it through the blog.  As I mentioned in my previous post, I learned a great deal from this exercise, not the least of which was how much fun I had writing about it, and how motivating that became.  So much so that, as I hinted in my previous entry, I am planning the next project already, and hope to write about that soon.

In the meantime, if you're still working on the hoodie, or just thinking about starting, let us know in the comments.  If you have ideas for future projects, we'd love to hear them.  Ideas for topics around expanding our machine knitting skills and using our machines creatively are especially welcome, or if you have links to creative machine knitters out there, please share!

Nancy

Wednesday, June 7, 2017

Putting It All Together - Part III - Finishing

This is it, the last leg of our epic journey!

Below are pictures of the neckline being hung on the machine


And below is a picture of the hood now hung on the machine.


Remembering to turn back the hood stitches for the cord casing.


And completely forgetting to include the front bands as part of the neckline to which the hood is to be attached.


This mistake pains me. (Also, sorry about the bad lighting - it really is the same sweater.)  But, I've decided I'm just going to have to live with it because the amount of un-doing that would be required to fix it at this point, with waste yarn yanked off and ends woven in, would exceed my irritation level for the mistake itself.

So let's just move on - nothing to see here.  Let's instead talk about errors for which I had a fix!  Somehow, again without noticing, I dropped two stitches on the shoulder seam (captured in the safety pin below so I wouldn't forget about them).


This I was able to fix more or less invisibly (below) with some yarn ends.


Another error I didn't notice until everything was off the machine was that, when I attached the front bands, instead of drawing the stitches through either both thicknesses of the bottom bands, or at least the front layer, I drew them threw the back layer of the band leaving a gap in the front, shown below.  At least in this instance I remembered to include the bands.


I managed to sew it up more or less invisibly. 


I confess my errors and shortcomings above with the hope that you can avoid them.  After all, this whole project has been all about the learning!  And I for one have learned a lot, and the project has given me a great opportunity to practice and improve my skills.

I decided not to make a cord for the hood.  I did notice that the instructions call for making the cord by knitting circular on a double bed.  Normally when I knit cord, or I-cord as I'm more used to calling it as a hand knitter, I knit it just on the main bed by setting the carriage to slip in one direction only.  With my weight of yarn, a 3 stitch I-cord would likely be plenty, and I usually just use my hand to weight it.  Since the entire hoodie is knit without the need of a ribber, if you happen to be using a machine that doesn't have a ribber, you can certainly knit the I-cord without one as well.  For more thorough instructions on that, here is a good video by Diana Sullivan.

So the ends are woven in, the mistakes (except one - shhh) are fixed, and the last thing to do is fasten down the cord casing on the hood.  I decided that I would continue to follow the theme of chains on the public side of the garment.  So instead of sewing down the casing I took my trusty crochet hook and ran a line of crocheted chain through to secure it down as shown in the photo below.  I also decided that I wanted the chain raised a bit, so rather than one chain per row, I elongated the chains to one chain every two rows.  I'm pleased with the results.


Sometimes not having all the equipment (like sewing machines) at hand inspires creative solutions that add a little something to the finished project.

I had hoped to close out this entry with a photo of the complete, blocked hoodie, but I won't get a chance to do that probably until next week, and I wanted to report on all the other aspects of the finishing (the good, the bad, and the ugly!) before then.  But essentially this project is finished, and although I will definitely do a post with a picture of the completely finished hoodie, there won't be anything more from this hoodie correspondent unless something comes up in the comments that inspires an entry.

I've learned a lot doing this, and hope you have too!  Feel free to send questions any time in the comments, or update us on your progress.  I already have an idea for another project so stay tuned for that.  We'll also announce future meet-ups here as they were great fun, and I may throw in the odd book review.  Or if anyone has any suggestions for further topics, please let me know in the comments.

Thank you for following along!

Nancy


Wednesday, May 31, 2017

Putting It All Together - Part II

Next up for me was knitting the front bands, attaching them to the front pieces, and then attaching the zipper.  This is a slightly different order than that given in the pattern instructions, so I'll explain why.

As I've mentioned before, a lot my stuff is in storage as our house is for sale.  For some reason that I cannot understand, an overstuffed craft room does not "show" well.  This led to some negotiation as to what constitutes "overstuffed" and what constitutes "essential tools and materials", so the result is a compromise not fully endorsed by either party in the negotiation, but there you have it.  My sewing machine is in storage.

The instructions call for knitting the bands and then sewing the zipper to the bands before attaching the bands to the front opening of the sweater.  I think this is a solid plan, but without a sewing machine I decided to take the opportunity to do a little research to see what other methods are available.  I should also remind you here that I'm knitting on a mid-gauge machine with hand knitting yarn, so my fabric is thicker that those using standard gauge.  That also makes me shy away from using a sewing machine on my knits as they are thicker and the stitches are a larger gauge.  And I also find sewing successfully on knits very challenging to get a smooth, non-puckering line of stitches.  So I poked around the internet for alternative methods, and YouTube did not disappoint.

Take a minute and watch this excellent video from Interweave.  Doesn't that "knitpicker" look exactly like a latch tool that we are so familiar with?

I didn't stop there though, I found another great video here.  Even though this was addresses crochet specifically, there are things to be learned.

Finally, here is a blog entry referred to in the Interweave video.  Have a read.

So I thought about these and decided that I would just do a running stitch up each side of the zipper, like so:


Once I finished prepping the zipper, I went to the machine and and knit the front bands.


What is this striped blanket you may ask?  Well, everything that isn't pale blue is waste yarn, and both bands are knit with waste yarn separating them, and also beginning and ending with waste yarn.  As I get to the end of this project I'm running out of waste yarn already wound into balls so I've been just grabbing whatever is on my table - hence the lovely combination of pale green, dark blue and white.

Once the bands are hung and the waste yarn is removed, I can assure you with the picture below that there were front bands hidden in that striped fabric hanging from my machine, and here they are in place.


Here's a closer look at the nice finish that the one row of garter stitch gives (still unblocked though remember):


You may notice that I didn't sew the zipper on the bands before I hung the bands on the front.   It was a close decision, but I decided against it as my zipper is a bit bulky and I want the teeth very close to the folded over edge, but the tape is wide, so I was afraid it would interfere with the carriage as I was hanging the front bands and knitting the loose row for the chain cast off.  The zipper is also a bit short as I had very limited selection where I shopped.  So I wanted to place it on the garment to see where it would be least noticeable to sacrifice the length - at the top or bottom.  Finally, I'm not terribly happy with the colour of the zipper (it's a light grey not quite as it is showing up in the picture), so if I can find a better one I'm going to replace it.

Here's a picture of the sewn in zipper:


You can see that there are a few small "waves" in the zipper - nothing terrible and I'm going to let the hoodie rest on the dress form for the day and see if anything works itself out.  I suspect that the problem is that the zipper is just too heavy - the tape is quite stiff.  There is a lot to consider when picking out the proper zipper for a project!

I'll be back with a follow up on that soon, as well as the next step - attaching the hood!

Nancy